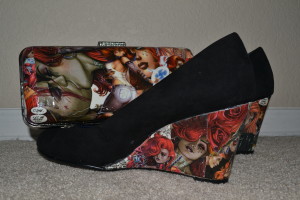
This is the second part of my “I Got My Mod Podge On” set. The previous set featured information on how to make the CLUTCH.
I have no idea how I was sparked by inspiration to begin decoupaging stuff, but somehow I was. Over the course of a few months I had created three clutches and two pairs of shoes. So, how did I make the shoes? Let’s find out…
1) Research. RESEARCH. Really. I did research. What else could/should I have done when trying something I never had before? So, I researched. How does one decoupage? What are the materials? Is there some techniques I should know? Let me share my results with you:
- How to decoupage, in general.
- Find the materials - general. The paper you want to use, mod podge, clear furniture lacquer, fine grain sand paper, and paint brushes.
- Find the materials – shoes. A pair of shoes made from leather, faux leather, patent leather, etc. Pretty much anything smooth, and nothing made from fabric or suede. You want a smooth surface. I noticed that every example pair of shoes I found on the internet were covered completely, and then showed wear and tear like crazy due to shoes flexing and bending during walking. I didn’t want wear and tear to show. I didn’t want my shoes to look worn within a few times of wearing them. To combat that, I went with a wedge because the wedge part of a high heel doesn’t bend, fold, or crinkle. It stays sturdy and I would never have to worry about rips or tears due to creases forming as I walked.
- Research techniques. Here are some web pages that I used specifically for these projects: Creative You! – Craft a Pair of Decoupage Shoes and Anomaly Blog – Geek Crafting: Comic Book Shoes
- Ask questions. If I had a question, I asked it in the blog tutorials I had found. Sometimes I received answers and sometimes I didn’t. But when I did, the advice was invaluable!
- Find examples of what I wanted the end result to me. Examples like: Star Trek Shoes, Poison Ivy Shoes, and Music Shoes.
- Strive for better. See this set here: Batman Clutch and Shoes Set. Notice the paint strokes showing in the glare? And the crinkles in the clutch? I decided I could do better. And I did. Knowing how shoes work (the bend and fold as you walk) and taking where the bends occur into account, doing a good finish, and taking the time to complete the number of coats needed for a great finish, fixes this problem and made my project look like a million bucks (in my opinion)!
- Be Prepared for a Learning Curve. If this is the very first time you are doing decoupage, prepare for the possibility that it wont turn out exactly as you want it to. Trial and error is a life skill and definitely applies here.
- Take Your Time.
View the Prezi below to follow along and make your own shoes!
These comic shoes were made for walkin’!


Do you have any pictures of your finished product?
I added a photo of the completed project. There are also TONS of pictures in the Prezi Tutorial included in the post