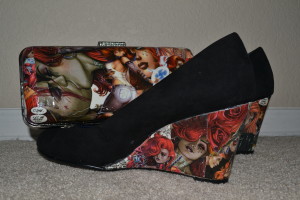
This is the first part of my “I Got My Mod Podge On” set. The next set will feature information on how to make the SHOES.
 I have no idea how I was sparked by inspiration to begin decoupaging stuff, but somehow I was. Over the course of a few months I had created three clutches and two pairs of shoes. So, how did I do I make the clutches? Let’s see…
1) Research. RESEARCH. Really. I did research. What else could/should I have done when trying something I never had before? So, I researched. How does one decoupage? What are the materials? Is there some techniques I should know? Let me share my results with you:
- How to decoupage, in general.
- Find the materials - general. The paper you want to use, mod podge, clear furniture lacquer, fine grain sand paper, and paint brushes.
- Find the materials – clutch. For the clutch, I had to figure out what the specific purse creating supplies were called, which was harder than I thought. Searches for ‘clutch’ ‘clutch supplies’ etc. did not yield what I was looking for. Finally, I stumbled upon the correct term of ‘dressing case’ which finally yielded results online. Here are search results in Etsy for clutch dressing cases (hard sided clutch base sides with frame). One thing to note is that these are meant to be decorated/crafted. They come as a set: two black plastic sides and one metal frame. You decorate the sides and then glue them onto the base. The other main thing you will need is some hearty all-purpose glue. Do NOT use super/gorilla glue. You need the even-more uber stuff. It should come in a tube and be more like gel than a liquid. It should be rated for metal, plastic, and cloth. Lastly, you will need a hot glue gun and fabric for the lining of the clutch, I recommend velvet.
- Research techniques. Here are some web pages that I used specifically for these projects: Southern Blackberry Designs – How to Decoupage a Purse
- Ask questions. If I had a question, I asked it in the blog tutorials I had found. Sometimes I received answers and sometimes I didn’t. But when I did, the advice was invaluable!
- Find examples of what I wanted the end result to me. Examples like: Aquaman Clutch and this Bird Purse.
- Strive for better. See this set here: Batman Clutch and Shoes Set. Notice the paint strokes showing in the glare? And the crinkles in the clutch? I decided I could do better. And I did. Knowing how to do a good finish, and taking the time to complete the number of coats needed for a great finish, fixes this problem and made my projects look like a million bucks!
- Ignore some Instructions. Coordinate the project you want with directions that make sense. This can sometimes backfire, but if you use your head you can go through the directions and figure out what applies to your specific project. For example, the clutch, which had no 100% directions for me, so I used about 4 different instructions and came up with a set that worked for me. Some directions were not needed, like a painted color background, so I ignored that step.
- Expand on some Instructions. For the most part, I noticed that the instructions I found didn’t put enough emphasis on the finish/lacquer step of these projects. I had found one set of instructions that said to use a spray gloss finish, but I was very unhappy with the results. With my dad’s help, though, I was able to get the right type of finish and expand on the “apply a few coats of gloss” that was listed in instructions to “apply a shit load of coats” with amazing results! So, some steps in the directions need expanding on.
- Add some Instructions. The clutch, for example, will need a template made for lining it (or if you are doing one solid image on the outside). I made my templates using newspaper and spent extra time making sure they were done right, which involved multiple attempts, wielding scissors like a boss, and scotch tape.
- Be Prepared for a Learning Curve. If this is the very first time you are doing decoupage, prepare for the possibility that it wont turn out exactly as you want it to. Trial and error is a life skill and definitely applies here.
- Take Your Time.
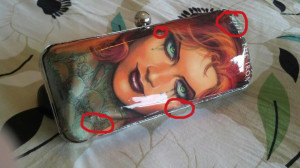
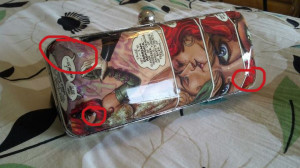
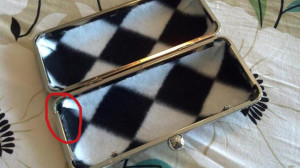
2) I failed on my first attempt. Well, not “failed” per say, more like “didn’t live up to my own expectations.” I’m calling it my practice clutch. Want to see it? Okay. All of the red marked areas are my “needs improvement next time” sections.
Most are due to the attempt I did of using a spray on lacquer. It did NOT give me the results I was looking for, and I ended up sanding off some of the paper, which is what made the biggest shit results on the clutch project.
The other issue was caused by me attempting to use one large piece of paper instead of a bunch of small ones. I still like the result of this (one large image on each side) but it definitely made it a LOT harder.
Another issue was my first attempt of using cheap thin fabric for the lining, and then fleece on top of it. Fleece is way to thick to use, especially when on top of another fabric.
Lastly, wait. Wait longer than you think/want for the lacquer to completely dry before using it. I ended up wrapping the clutch in a bag to bring with me on a trip, but it wasn’t 100% set and ended up getting the indentations of the bag on it. I had to re-sand and put another top coat of lacquer on it to fix it.
So, what did I learn? A) Go straight to the good stuff for your top coats: hardware-store-high-gloss-furniture-lacquer. And do a CRAP load of coats. 10 or more coats. B) Use small bits of overlapping paper, OR work more slowly when using one large piece. C) Use flannel or velvet for lining. D) Wait for it to dry completely before using it. That means waiting 2-3 days after your last coat of lacquer.
3) Take two. Try again.
Check out the Prezi below with the successful directions.
Are you ready to start gluing??


Thanks for the info, did you also use clear furniture lacquer on the shoes?
I am so sorry, I just saw this comment. Yes, I used clear furniture lacquer.